Saturday, October 30, 2010

Wire mesh + rebar

Continued our efforts of placing wire mesh and rebar today. We have run out of #5 rebar so tomorrow we will take a tourist day. We are about 70% the steel work for the slab area. We anticipate another whole day of work to finish the wire mesh and rebar placement and then another whole day to place the 344 pieces of #5 rebar which will go into the outside walls.


Friday, October 29, 2010

Wire, wire, wherefore art thou wire?

So after the compaction came the wiring. We placed our wire mesh in place, put the necessary supports under the lower and upper one. The lower will be 1 1/2 inch from the bottom of the rock and the top will be 6 inch from the rock, which means it will be 2 inch from the water because we will have 8 inch's of concrete on the slab. Its a little tricky walking on the wire mesh, however we have figured out a system with some 5/6 inch plywood pieces that we can place on and walk on that without much issue. By the time we got to the second set of wire mesh we had improved our technique. The foundation also requires #5 rebar all along the footing as well as a #3 rebar higher up in the footing as well. Quite a lot of steel. Also we are making sure when we place the rebar that they are continuous around the corners and not wired there by us. This should add extra strength to the corner I believe. Its quite exciting and challenging to figure out the bends in the 20 foot piece of rebar that they come in. Our rebar bending Hitachi tool has been essential for the work.


We use a handy wire tool which by pulling twists the wire saving a lot of time.

Footing rebar in place and wired.


6 inch rebar seat/chair

These are the 1 1/5 inch chairs.

Jumping Jack foundation wall fun..

So we started our morning out with a quick drive to Hilo to purchase some 6" tall rebar chairs/supports. Without these we could not proceed any further with our project. We also picked up a jumping jack compactor from Puna Rentals in Keaau. They have all sorts of equipment for rental so we will be visiting them frequently throughout this project probably. We had distributed our footing base course too much since we compacted it so we thought this was a worthwhile exercise. We also were seriously low on many spots, most especially after compacting twice or three times. So we had to fill back quite a lot of material to bring it up to grade again to the bottom of the slab formwork. Here are some pictures from our work.

Our foreman checking our Jumping Jack work.

Completed jumping jack work.

Thursday, October 28, 2010

Rebar bending video...

Here is a quick video how bending and cutting of the rebar works:

200+40+344+344+190+40 = 1158 rebars to bend..!

So we started our bending of the rebars. I have nice video showing how the machine works also in the blog post above. We have quite a bit of bends to do. Some are for the interior walls, some are for the footing walls some area meant to go up into the walls of the tank. Here are a couple quick pics:

Completed bends for our exterior wall footing.


We use spray paint to mark many at a time where we will cut them.


Using some temporary 2x4 to figure out how much deeper and wider we need to make our trench.


Our first bend, turned our perfect!

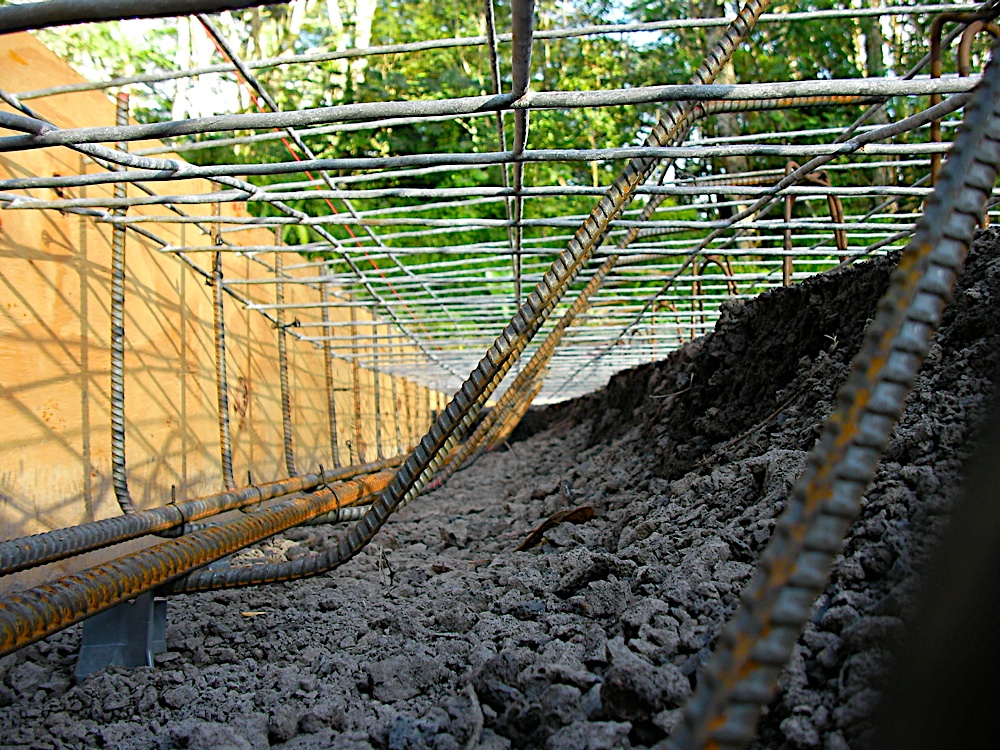
Digging our trench wider to accomodate our 45 degree bend.

Finished trench and temporary.

Our foreman is always present and inspecting our work.

No ditch witch here.. Just two men in funny hats and overalls..

Made some good progress with our trench work. We completed digging out what we needed. Quite a lot of wheel borrows later we were finished. The centre section you see in the first picture goes down 10 inches and then the rest will go down to 16 inches like the outside wall footings. We might use a jumping jack compactor to compact down the disturbed rock again.


Wednesday, October 27, 2010

Trenching..

The day was mainly spent with going to Hilo in the morning to take care of odd's and ends. We needed to buy more supplies at Home Depot as well as Whitecap which provides the concrete accessories. We needed to buy our rebar chairs/castle chairs or however else you wish to call them. This keeps the rebar and wiremesh up in the air so it won't be laying on top of the base course rock where it would provide no benefit.

After we got back we got some work in though. We need to dig out some material for some inside supports walls which we will have. Its easier to do this now then trying to do it while we were filling the whole space in. We needed to go down 10 inches for this particular wall section that you see here. The other sections will be down 16 inches. We will rent a Jumping Jack style compactor which is able to fit into these small spaces to provide proper compaction.

Tuesday, October 26, 2010

How to pound rebar..

This is how we pounded the rebar into the property for our triangle supports. Enjoy!

Final slab formwork support completion..

We have finished the small section of wall which was left un-supported thinking they needed to back in truck for rock. I've made a video showing how we pounded in the rebar to hold the support against the formwork. You can see in the video how we did it also. We needed to pound in 142 of these rods into the lava rock. Suffice it to say, I don't want to see a sledge hammer for a while. We also put some wire mesh down where it will eventually go. It needs to be brought up 2 inches from the rock floor for one layer and then 6 more inches for the second layer.


Final base course video...

Here is a quick video of the final base course day.

We've been based, of-course..

Today was an exciting day. We finally brought in 3x20 tons of base course. This it turns out is more then  we needed. We put down a layer then compacted it and then put down another layer. As you see from the pictures we covered all our plywood with plastic sheets because our plywood wasn't very happy about all the rain it has been getting overnight. Of course the final work of grading with rakes was performed all the in the pouring rain. All in all it turned out good and we're heading back now to finish off the supports on the final wall which we didn't have to move out after all. More pictures will follow later today.


This was an exciting moment! Our excavator tipped into the pit while he was spreading our base course. Lucky not where our formwork was otherwise he would have crushed it. Anyway, he managed to crawl out of it without issue.


Monday, October 25, 2010

How more titles can I come up with formwork support? Support 99% done!

Today we wanted to get started nice and early. So we got up around 6:30am and were ready by 7am. Then it began to rain like it was from a bucket. This is not unusual for this part of the island as it does receive 3.63 meters per year. We waited till about 7:45am when it finally stopped for a while that we felt we could head out there. We setup our stuff and then it began to rain again. Not wanting to waste anymore time we got our trust canopy tent where we could work more dry. Getting wet isn't much of an issue here since its warm rain. The humidity level must have been somewhere between 98% to 99.5% today all morning. My regular open frame work glasses were foggy for hours and they didn't clear up at all.

We finally managed to finish off all the supports. We needed to create more triangle supports since we needed many for our curved walls. These aren't things you want to be cheap on. A concrete breakout isn't a fun thing to have. All in all we have 71 supports which required about 36 pieces of 2x4 8 foot lumber. We also had to cut a bunch of rebar which was then pounded into the ground by myself. I've had enough sledge hammering for a while. Its not your typical hammering. If I don't want to smash my work to hell or my dad's hand then it means I can only hold the hammer about 1 to 2 feet from the rebar top. It was a rather damp and tiring day.

The best part was when we finally finished at about 3:30pm and could finally go home. A small section of wall remains to be built since thats where the excavator will enter tomorrow when they bring more base course to fill up the centre of the tank. So we will build that once they are done with that, probably tomorrow. Enjoy the completed pictures. You can see our nice canopy tent which we bought at Walmart and will be returning because one of the legs broke as we were taking it down. You pay what you get for I guess. At least it kept us out of the sun once and once out of the rain.