These are the inside topple supports we put in. In a couple of places we were able to straighten walls also with these.
Building one of two homes in Hawaii in Nanawale estates on the Big Island of Hawaii.
Tuesday, November 23, 2010
Pipe dream...
So the most important feature of our watertank is of course the pipe's coming into the tank. Without these it wouldn't be much more then a simple concrete cave / wine cellar perhaps. We made 4 in coming drains and 2 overflow drains. We also added a floor drain for draining the entire tank if ever needed. We are using the special white pvc pipe which is suitable for potable water, the black plumbing pipe is not.
Overflow drains at exactly 92 cm height.
Our drain pipe, which is a 2 inch pipe with waterstop around it. We will add a tap on the outside somewhere when we are done.
Monday, November 22, 2010
Formwork topple support..
Here you can see how we have braced the formwork from toppling over. We braced it on the inside as well, i'll post those pictures tomorrow. This is really only meant to prevent the whole thing from toppling over, which is very unlikely anyway. We also placed the final small section of waterstop in the area we left it out in for drainage. Tomorrow morning we will put in the drain, intake and overflow pipes. I'll have some pics of that tomorrow also when its done of course.
Wall formwork measurements...
In order to obtain the most accurate measurements for our concrete tomorrow we measured the wall very accurately. My measurements show we have 185 feet 11 inches (56.6 meters). So I rounded it up to 186 feet (56.69 meters). When you multiply that with 3 foot 5 inches and then 8 inches you get the cubic yards. The final number comes to 15.69 yards of concrete. So we have ordered 16 yards for tomorrow's pour.
Sunday, November 21, 2010
All I see screws..!
I seemed to have miscalculated the screw count. I was only counting the inside wall. The outside took the same number of screws. So its at least 3500 screws plus extra's we used to hold the 2x4 corner supports with as well. We used 1 5/8 (4.12cm) for all our plywood holding power. Of course we will need to remove all these at some point as well.
Saturday, November 20, 2010
Wall formwork done!
So it took exactly a week but we have finished the wall formwork. I used our new ladder to climb up to our container roof and take this picture. You have a better vantage point from here. Remember, you can click any of these pictures to see them in much larger size. Our inspector is coming monday and we will add some supports on the inside and outside to prevent it from tipping over. Otherwise we are ready for concrete. The pumping guy and concrete is set to come for Tuesday. We covered a section of wall with a piece of styrofoam because we ran out of plastic covering.
My calculations indicate we have probably used at least 1600 screws to hold the plywood to the spiderties. We also have many supports in the corners, etc. So we probably have about 1800 screws or more holding this thing together. Concrete release compound has been put on the inside of the concrete so it releases when we pull the plywood off.
We heading to the beach tomorrow for some R&R. The weather has been very good for several days now with no rain. Somewhat more comfortable to work when your not so damp.
Men at work...
We finally got a camera crew to film our progress. This is how we hang those pieces plywood on the spiderties and carry them around the tank. The work is quite fast, except that each sheet needs about 50 screws in it. I will calculate the final number of screws we used this evening when I post again. Enjoy the video.
Friday, November 19, 2010
Stop that water.. using a waterstop product..
So here are some pictures and video on application of the waterstop product by Greenstark. Think of this as a big black rubber gasket. This will expand when it gets wet and fill any voids and cracks. You can see from the pictures and video how we applied the adhesive and then when the product is in place. It sticks to your fingers/gloves and is a little tricky to handle. But it has a nice non stick backing which makes it easier to work with for sure.
Applying the adhesive / glue to the concrete.
Waterstop in place, stuck to concrete.
Cleaning out foot(ing)...
Its important to clear out all the debris for our footing before we apply the waterstop product. The product has a black adhesive which you then stick the black sticky tar like waterstop to. The paint takes two hours to dry, however it was faster with our sunshine today which is good. There were all sorts of concrete pieces left over, bits of wood from our J dowels holders as you can see. First we blew out the footing with a leaf blower then we switched over to its vacuum setting. You can get an idea of the process in the attached video.
Thursday, November 18, 2010
Skirt..
We stapled a skirt to the footing to prevent water from flowing back in from the edge to the formwork and disturbing our water stop. Not as pretty as women usually wear, but it will do for out purpose.
We also received our 40 pieces of plywood which we moved some of down to the slab and most went into the container as well.
Bendo'plywood..
We finally got around to placing our 11/32 inch plywood today. This allows for making bends quite easily. We use two overlapping pieces to bend these gentle curves. Our inspector is coming on monday so we need to finish off some things by then. We need to put in our waterstop, however that proves challenging since if it gets too wet with rain it gets ruined. We also need to clean out the debris from beside the forms so the waterstop adhesive won't have any issue bonding to the concrete. We also need to decide where our drains from our roof will come in and how many. We also need to make a drain out section on one corner of the tank as well. We also need to make some drains for the overflow also. The drain out is more important for the construction then anything else. Imagine, as it rains, the tank begins to fill with water. Certainly if I was in Los Vegas, this isn't an issue since it doesn't rain. Even on the other side of this island where it rains only 1 inch per year its not an issue. But overnight here you can receive 5 inches of rain or even more some. Anyway, so the drain will be handy to leave the drain open while we build the top of the tank slab formwork.
Wednesday, November 17, 2010
Plywood till the eye can see..
We continued our placing of plywood today. We are out of material and tomorrow they are brining 40 more sheets. We already brought 20 sheets so that makes 60 sheets in all. This is equal to 480 feet (150m) or 1920 sq feet of material. We also went around to reinforce the corners as we are supposed to do (see pics below) and also where the material overlaps.
We had to purchase a ladder today since its going to be challenging to get into our wooden tank. However while writing this blog it downed on me we bought the wrong type. There are stairs only on one said and not both sides. We can walk up but not down on the other side... Oops...
The other thing we did was to tie off our 160 pieces of 60 inch rebar which will then be bent into the top slab. They are wired to every second dowel which means 12 inches.
Our next biggest challenge will be the waterstop. Because it rains here so much overnight this proves to be a challenge. Here is the situation. From the outside we will staple a plastic sheet all the way around the waterstop, thats easy. The problem is what falls on our slab. This will automatically tend to drain to the edges somewhere. Where of course our waterstop will be not covered by concrete yet. So it looks like our only option is to setup our square tent in the middle of the house and erect enough tarps and plastic so the water will be guided to the outside of the house so it doesn't collect on the inside slab. Once this is done, we can place our inside plywood sheets and get ready for our concrete pour.
Corners are reinforced as you can see here with an extra 2x4 and screws every 6 inches.
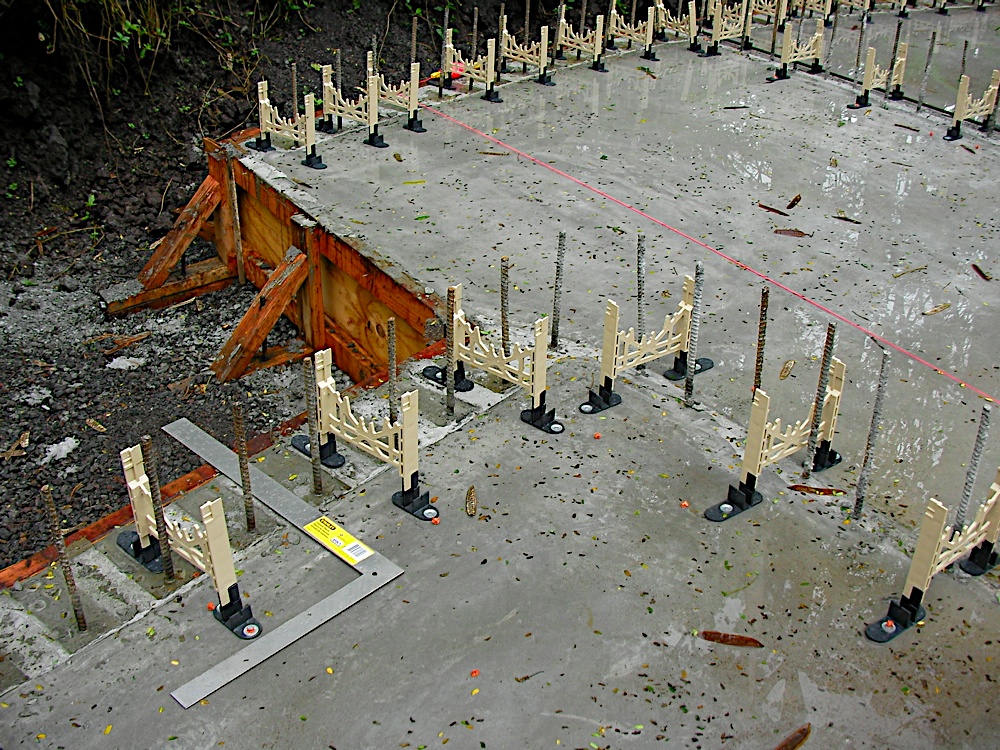
Tied off dowel to our 60 inch vertical rebar.
Tuesday, November 16, 2010
Covering our spiderweb..
We spent most of the day finishing off the plastic spiderties. We needed to place and bend all the rebar as well for all these wall sections. We are leaving one area out since it makes our life easier to carry materials in, etc. Eventually we will need to buy a ladder to walk into the tank area. We had to deal with some on and off rain all morning as this is the wet season they tell us. Anyhow, could be worse when I think about the snow people work in. In an effort to save as much plywood and minimize cutting, we are letting our sheets hang over the edge of the wall formwork. We ran out of material (rebars) early this morning, however whitecap was able to deliver our goods earlier then we thought so we had no delay in work. Tomorrow we will finish off all the straight walls and then tackle the curved sections. We will try to pre-bend our 5/8 (15.9mm) plywood so it won't push over our spidertie walls. We only have 5 or 6 sheets left and need to order more material tomorrow from HPM.
Almost completed section of spidertie walls. On the corners we add 2x4 bracing which helps bind the corners together and add support for our concrete pour.
Doweling..
Since it wasn't practical to place rebar dowels everywhere, we are placing some in after the concrete has cured and set. This is a common practice and with the proper epoxy from Hilti its a easy system. We have a nice hammer drill which we will need eventually to place many screws, etc. It has many uses not just drilling. I will be making a concrete key with it as well, i'll have more info on what that is when I do it. Check out the quick video i put together:
Monday, November 15, 2010
Tying a spiderweb of rebar and plastic...
Sunday we took a day off for some R & R. Today we were hard at work, at the job site by 6:50am. The ramset tool got a lot of use today. You could smell gun powder all day long. We shot in about 200 pieces of 1 1/2inch nails with washers. These hold down the spidertie feet to the concrete. We decided to build, bend and place all the rebar for the entire spidertie walls first before we started putting in our plywood. We placed all the starter feet down first. The straight sections require them every 16 inches and the curves have them every 12 inches. We also made a minor mistake today when selecting our rebar for our walls. Instead of horizontal #3 (3/8 inch thick) rebar we started using #4 (1/2 inch thick). So we need to send back a bunch of #3's now and order from more #4's tomorrow. Hopefully they can deliver them tomorrow or else we run out of materials. We have over half done of the spidertie walls as you can see from the final pics.
The waterstop material will run between these legs and will be placed before the pour of concrete.
Our workstation to deal with the rain sessions. It usually only rains for about 5 or 10 minutes then stops for 30min to 60min. The morning forcast had 90% chance of rain till noon then 100% chance after noon. Well, after 2pm there was no more rain so I guess they were wrong.
Completed spidertie wall without plywood, final rebar in place.
Difficult rebar bends are behind us now. Tomorrow we should make good progress.
Saturday, November 13, 2010
Tear'em up..!
Since we do not have any need for these wood supports now and our concrete has cured enough to remove these J dowel wooden supports. Takes a little muscle and good exercise to tear them up. The concrete didn't stick too badly to them and the nails we used didn't hold all that well also. I also went ahead and bought some gas pipe and straightened all 350 J dowels which needed it. You can see in the first picture below some where crooked which is fine, because now that they are embedded you can easily straighten them.
You can see the long crowbar I using to tear up the wood supports for our J dowels. By the time I got to the 30th or 40h we figured out how to quickly rip them up. I broke a cheap $5 hammer when I started so we had to move up to something bigger. :)
My gas pipe used to straighten the J dowel rebars.
Tying your spiderweb..
Here you can see how the spidertie is screwed to the wall. They provide a nice template so you know where to put your screws. Takes a little practice to figure out how much you need to drill the screw in, however by the 15th you have it figured out fine.
How the alignment tool lines up on the spiderties on the other side and shows me where I need to put my screws. Very handy indeed.
We use 1 5/8 course thread #10 screws. Difficult to find these screws.
Building a spider web..
Here you can see we have built up the spidertie wall already and placed the rebar. Its spaced every 6 inches horizontal and 12 inches vertically. Slightly overkill for a wall which only holds weight from the top and there is no pressure against the sides.
First run of spiderties for middle support wall..
This is the first run of spiderties we are using. You can also see how the ramset fastening tool works also. First shot didn't go off since it had fired already and i didn't load a new shot.
Subscribe to:
Posts (Atom)


